Summer Salads

In our family, we love cool, refreshing salads in the summer. And because each family member has different likes and dislikes, we like to try a variety to find family favorites.

We found this link to 100+ summer salads, and thought we would give a bunch of them a try.

Our favorites are: Chinese Chicken Mandarin Salad (2), Buffalo Chicken Potato Salad (15) – it’s a touch on the spicier side, Dorito Taco Salad (39) – this one was a hit with the kids, Strawberry Balsamic Pasta Salad (63),  and Strawberry, Raspberry, Cranberry Avocado Spinach Salad (104).

We’d love to hear from you if you give some of these a try. Let us know your favorites in the comments!

Not all veggies are bad

Despite what my children might tell you, not all vegetables taste “disgusting.” In fact, just recently we found a recipe that they actually ate without making too many faces or throwing too many fits. Once they actually tasted it, they gobbled it up!

We owe credit for this recipe to Skinnytaste – one of our favorite go-to sites for healthy, good tasting recipes.

Oven Roasted Cauliflower

INGREDIENTS:

  • 6 1/2 cups uncooked cauliflower florets (about 1 large) cut small
  • 3 garlic cloves, chopped
  • 2 tbsp olive oil
  • kosher salt and fresh pepper
  • juice of 1/4 lemon
  • 2 tbsp Parmigiano Reggiano, freshly grated

DIRECTIONS:

  1. Preheat oven to 450°F.
  2. Combine cauliflower, olive oil, lemon juice, garlic, salt and pepper well so all the florets are coated and seasoned.
  3. Place in a large shallow roasting pan and place in the center of the oven.
  4. Roast for about 25-35 minutes, turning florets occasionally so they are evenly cooked.
  5. Remove from oven and top with cheese and some lemon zest and additional salt and pepper if needed.

Birthday desserts!

In our house, birthdays are a BIG DEAL! I think that mostly comes from my birthday being so very close to Christmas (I am a Christmas Eve baby) and there never really being an opportunity for me to have birthday parties as a child.

I have never wanted my children to ever think we didn’t feel their birthday was important so I have always gone all out for my kids’ birthday. This year my twins (Yes, TWINS!) turned 10. What better reason to make a gigantic deal about a birthday than it being the year they turn double digits, baby?

So how did I handle it? Well, with 3 days of birthday parties of course! Now I won’t go into all the details and bore you with my excessive birthday celebration for my kids, but I do want to share the recipe from my favorite chef (The PioneerWoman – found on her Food Network show).

This recipe is for her Ice Cream layer cake.

Ingredients

  • 1 pound cake
  • 1 cup vanilla ice cream, slightly softened
  • 4 large peanut butter cup candies, roughly chopped
  • 1 cup chocolate ice cream, slightly softened
  • 1/2 cup chocolate candies, such as M and Ms, roughly chopped
  • 1 cup chocolate chip ice cream, slightly softened
  • Chocolate shell ice cream sauce (the type that hardens), such as Smucker’s Magic Shell, for covering the top

Directions

Slice the pound cake horizontally into 3 pieces. Place the first slice in a loaf tin lined with plastic wrap. Cover the cake with the vanilla ice cream, followed by three-quarters of the chopped peanut butter cups. Add a second layer of cake and cover with the chocolate ice cream, followed by three-quarters of the chocolate candies. Place the last layer of cake on top, followed by the chocolate chip ice cream. Cover with the chocolate shell sauce, then the remaining peanut butter cups and chocolate candies. Let the sauce set for a few seconds, then fold over the plastic wrap and place in the freezer until frozen, about 4 hours.

When ready to serve, pull back the plastic wrap, gently lift the cake out and peel off the wrapping completely. Slice to serve.

You can watch a video on how to make the cake here.

The cake was a huge success and I had some very happy kids! This is a definite recommend.
A little comfort with my dinner tonight

Sometimes, when the weather is on the colder side, I just want a little bit of comfort food. And while I’ll admit, most of the time that is a rich, yummy dessert, tonight it is some super delicious stuffed mushrooms.

And, in my humble opinion, there is no better recipe than the one that Ree Drummond shares on her site ThePioneerWoman.com.

Watch for other recipes that we’ll be share from this amazing woman. For now, here are the basics for making stuffed mushrooms.

Ingredients:

  • 24 ounces, weight White Button Mushrooms
  • 1/3 pound Hot Pork Sausage
  • 1/2 whole Medium Onion, Finely Diced
  • 4 cloves Garlic, Finely Minced
  • 1/3 cup Dry White Wine
  • 8 ounces, weight Cream Cheese
  • 1 whole Egg Yolk
  • 3/4 cups Parmesan Cheese, Grated
  • Salt And Pepper, to taste

Instructions:

  1. Wipe off or wash mushrooms in cold water. Pop out stems, reserving both parts.
  2. Chop mushroom stems finely and set aside.
  3. Brown and crumble sausage. Set aside on a plate to cool.
  4. Add onions and garlic to the same skillet; cook for 2 minutes over medium low heat.
  5. Pour in wine to deglaze pan, allow liquid to evaporate.
  6. Add in chopped mushroom stems, stir to cook for 2 minutes. Add salt and pepper to taste. Set mixture aside on a plate to cool.
  7. In a bowl, combine cream cheese and egg yolk. Stir together with Parmesan cheese.
  8. Add cooled sausage and cooled mushroom stems. Stir mixture together and refrigerate for a short time to firm up.
  9. Smear mixture into the cavity of each mushroom, creating a sizable mound over the top.
  10. Bake at 350 degrees for 20 to 25 minutes, or until golden brown.

Allow to cool at least ten minutes before serving; the stuffed mushrooms taste better when not piping hot.

To see here beautiful photos as she cooks, make sure to visit her site here.

Thanksgiving Desserts

In our family, we love dessert. To be honest, we probably love dessert a little too much, but we won’t dwell on that right now. As we get closer to the holidays, my husband’s family divides up responsibilities for the meal we will share together. There are 17 of us, so that’s a lot of mouths to feed and too much for one person to prepare.

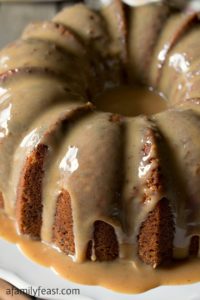
One of my favorite dishes that is always prepared by my sister-in law is this Toffee Pecan bundt cake with caramel drizzle.

It is seriously to die for! I could probably eat the entire thing, but I love my family so I share with them.

She shared the recipe with me that she originally found on a blog called A Family Feast. That blog has since become one of my favorites for pulling recipes to try.

I will admit, I haven’t tried to make the toffee pecan bundt cake on my own because let’s face it, I’m not even close to as good a baker as my sister-in-law. Instead, I wait patiently for Thanksgiving each year and hope she chooses that as the dessert to bring!

Here’s the recipe if you want to give it a try. You can also check out the blog for the recipe and some more pictures of this delicious masterpiece!

INGREDIENTS

For the Cake

  • Non-stick cooking spray with flour
  • 3 cups all-purpose flour
  • 1 teaspoon baking powder
  • ½ teaspoon salt
  • 1 ½ cups unsalted butter, softened
  • 2 cups light brown sugar, packed
  • 1 cup granulated sugar
  • 5 large eggs
  • 1 cup whole milk
  • 1 bag (8-ounces) toffee pieces
  • 1 cup pecans, chopped

For the Caramel Drizzle

  • 14 ounces (1 can) sweetened condensed milk
  • 1 cup light brown sugar, packed
  • 2 tablespoons unsalted butter
  • ½ teaspoon vanilla extract

INSTRUCTIONS

  1. Preheat the oven to 325 degrees. Spray a 12-cup bundt pan with non-stick cooking spray with flour and set aside.
  2. In a medium bowl, stir together flour, baking powder and salt. Set aside.
  3. In the bowl of a stand mixer, beat the butter until light and creamy. Add both sugars and beat again until fluffy. Add eggs one at a time, mixing until blended. Alternate adding in flour mixture and milk, mixing until just combined, being careful not to over mix.
  4. Stir in toffee chips and pecans by hand, blending well. Spoon the batter into the prepared pan.
  5. Bake for 75-80 minutes or until a toothpick inserted into the center comes out clean.
  6. Allow the cake to cool in the pan for 10 minutes, then invert onto a wire rack to cool completely.

Once the cake is cool, prepare the Caramel Drizzle as follows:

  1. Combine the sweetened condensed milk and brown sugar in a medium, heavy–bottomed saucepan. Over medium heat, bring to a boil, whisking very frequently.
  2. Reduce the heat under the pan and simmer gently for about 8 minutes, whisking constantly.
  3. Remove the pan from the heat and stir in butter and vanilla. Allow the mixture to sit in the pan for about 5 minutes – then drizzle over the cake. (You will want the drizzle to still be fairly hot when you drizzle it over the cake – it does harden a little after it cools.)